Installing a mini shaft might seem like a daunting task, but with the right guidance and a bit of patience, it can be a straightforward process. As a trusted mini shaft supplier, I've witnessed firsthand the importance of proper installation for optimal performance. In this blog post, I'll walk you through the step-by-step process of installing a mini shaft, ensuring that you can do it safely and effectively.
Understanding the Mini Shaft
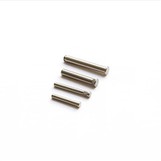
Before we dive into the installation process, it's essential to understand what a mini shaft is and its various applications. Mini shafts are small, cylindrical components used in a wide range of industries, including automotive, aerospace, robotics, and medical devices. They are typically made from high-quality materials such as stainless steel, aluminum, or titanium, depending on the specific requirements of the application.
One of the most popular types of mini shafts is the Stainless Steel Mini Shaft. Stainless steel offers excellent corrosion resistance, high strength, and durability, making it an ideal choice for applications where reliability is crucial. Whether you're working on a precision instrument or a high-performance machine, a stainless steel mini shaft can provide the stability and performance you need.
Tools and Materials You'll Need
Before you begin the installation process, gather the necessary tools and materials. Here's a list of items you'll typically need:
- Mini shaft: Make sure you have the correct size and type of mini shaft for your application.
- Screwdriver or Allen wrench: Depending on the type of fasteners used, you'll need the appropriate tool to loosen and tighten them.
- Pliers: Pliers can be useful for holding small components in place during installation.
- Lubricant: Applying a small amount of lubricant to the shaft can help reduce friction and make installation easier.
- Safety glasses and gloves: Always wear safety glasses and gloves to protect yourself from any potential hazards.
Step-by-Step Installation Guide
Now that you have all the necessary tools and materials, let's get started with the installation process. Follow these steps carefully to ensure a successful installation:
Step 1: Prepare the Work Area
Before you begin installing the mini shaft, make sure your work area is clean and well-lit. Remove any debris or obstacles that could interfere with the installation process. It's also a good idea to lay down a clean cloth or mat to protect the surface of your workbench.

Step 2: Inspect the Mini Shaft
Before installing the mini shaft, carefully inspect it for any signs of damage or defects. Check the shaft for straightness, smoothness, and proper dimensions. If you notice any issues, contact your supplier immediately to arrange for a replacement.
Step 3: Identify the Installation Location
Determine the exact location where the mini shaft needs to be installed. This may involve referring to the equipment's manual or consulting with a technical expert. Make sure the installation location is clean and free of any debris or contaminants.
Step 4: Apply Lubricant
Apply a small amount of lubricant to the shaft to reduce friction and make installation easier. Be careful not to apply too much lubricant, as this can cause the shaft to slip or become misaligned during installation.
Step 5: Insert the Mini Shaft
Carefully insert the mini shaft into the installation location. Make sure the shaft is aligned correctly and that it fits snugly into the opening. If necessary, use pliers to hold the shaft in place while you insert it.
Step 6: Secure the Mini Shaft
Once the mini shaft is inserted, use the appropriate fasteners to secure it in place. This may involve tightening screws, bolts, or nuts using a screwdriver or Allen wrench. Make sure the fasteners are tightened securely, but be careful not to over-tighten them, as this can damage the shaft or the surrounding components.
Step 7: Test the Installation
After securing the mini shaft, test the installation to make sure it is working properly. This may involve turning on the equipment or performing a simple function to verify that the shaft is rotating smoothly and without any issues. If you notice any problems, such as excessive vibration or noise, stop the equipment immediately and inspect the installation for any issues.
Step 8: Clean Up
Once the installation is complete, clean up the work area and remove any tools or materials that you used. Dispose of any lubricant or other waste materials properly.
Tips and Tricks for a Successful Installation
- Read the equipment's manual carefully before attempting to install the mini shaft. This will provide you with valuable information about the installation process and any specific requirements or precautions.
- Use the correct tools and materials for the job. Using the wrong tools or materials can damage the shaft or the surrounding components and may result in a failed installation.
- Take your time and be patient. Installing a mini shaft requires precision and attention to detail. Rushing through the process can lead to mistakes and may result in a poor-quality installation.
- If you're unsure about any aspect of the installation process, don't hesitate to seek help from a technical expert or your supplier. They can provide you with guidance and support to ensure a successful installation.
Conclusion
Installing a mini shaft is a relatively simple process that can be completed with the right tools, materials, and knowledge. By following the step-by-step guide outlined in this blog post, you can ensure a safe and effective installation that will provide optimal performance for your equipment. If you have any questions or need further assistance, please don't hesitate to contact us. As a leading mini shaft supplier, we're committed to providing our customers with high-quality products and excellent customer service. We look forward to working with you to meet your mini shaft needs.
References
- "Mini Shaft Installation Guide," [Equipment Manufacturer's Name], [Year of Publication].
- "Stainless Steel Mini Shafts: Properties and Applications," [Industry Publication Name], [Year of Publication].